Step-by-step walkthrough for running a trust analysis via the Portal or the API: upload the deed, run the analysis, retrieve and confirm the extracted structure, and associate the parties.
New to the Trust Analyzer? Start with the Trust Analyzer overview for what it does and how the flow fits together, then come back here for the full walkthrough.This guide covers both the Portal walkthrough and the API walkthrough. Use whichever fits your team — they produce the same result. Currently supports Australian trust deeds only.
An organization entity already created in the Portal.
Trust Analyzer enabled for your environment, with the workflow assigned and turned on in Ops Centre. Contact your FrankieOne representative if you don’t see it yet.
Available for Australian trust deeds only.
1
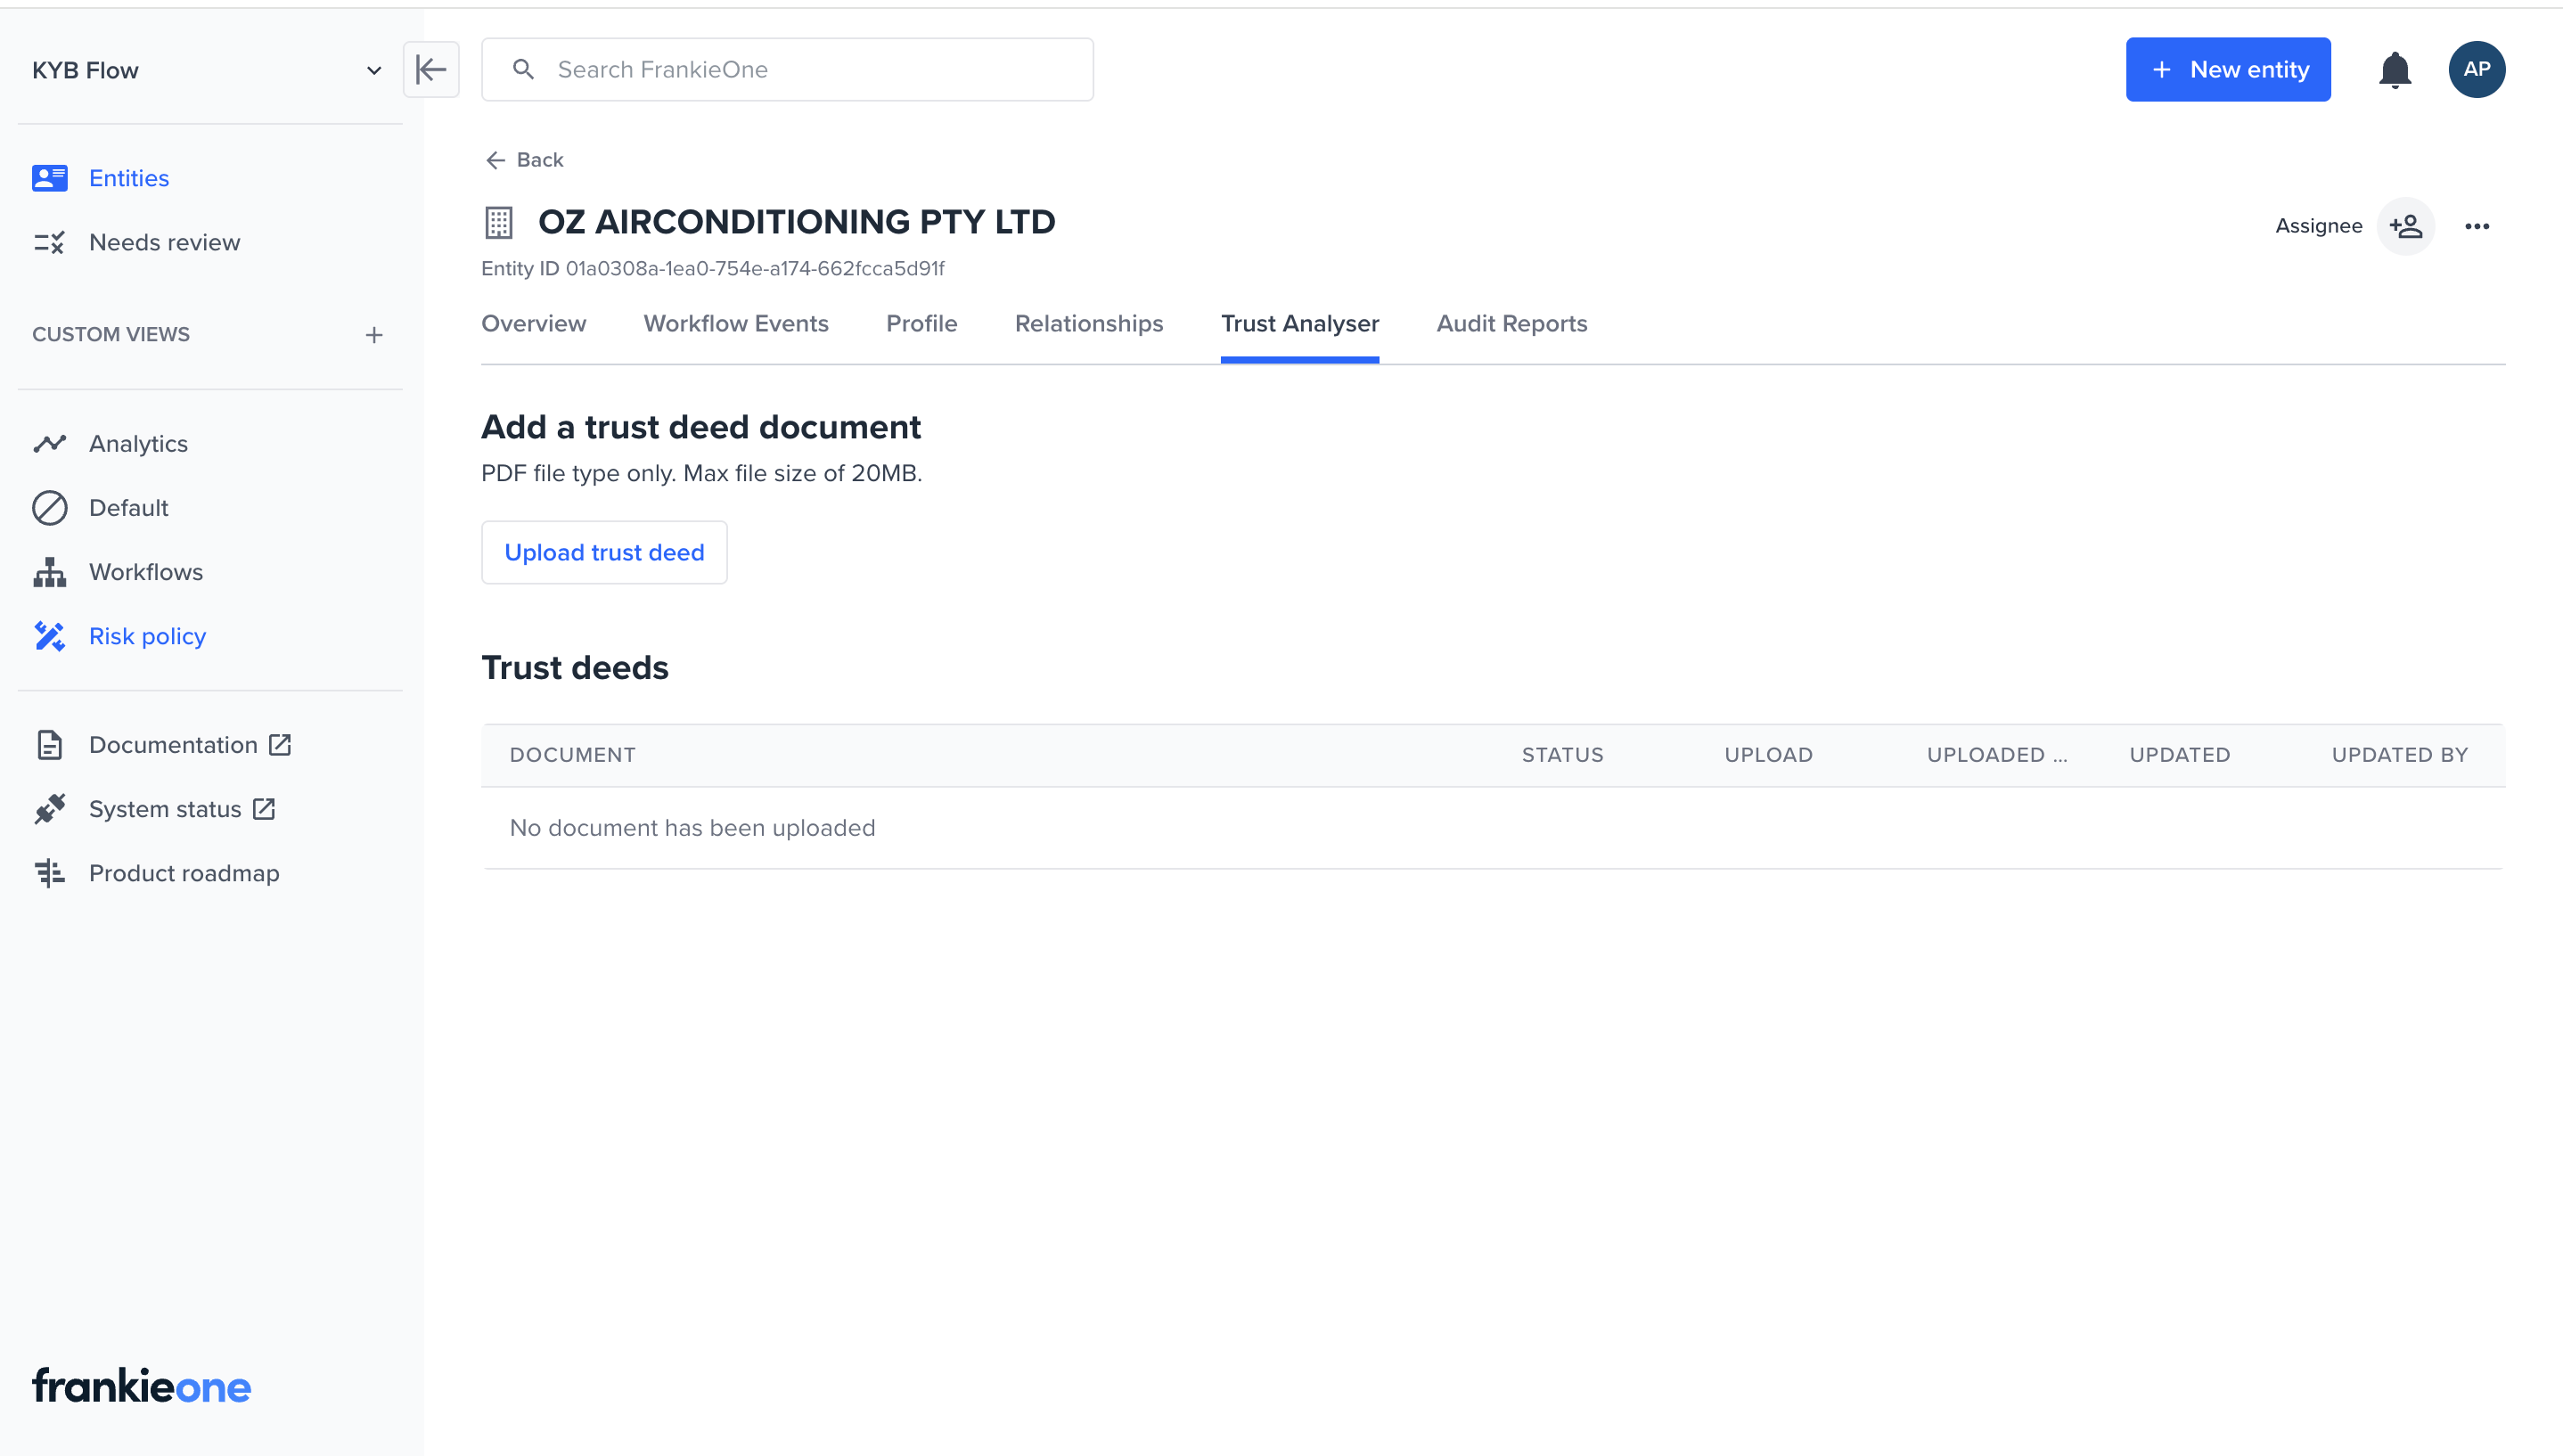
Open the Trust Analyser tab
From the organization’s Overview page, select the Trust Analyser tab.
Trust Analyser tab, no document uploaded yet
2
Upload the trust deed
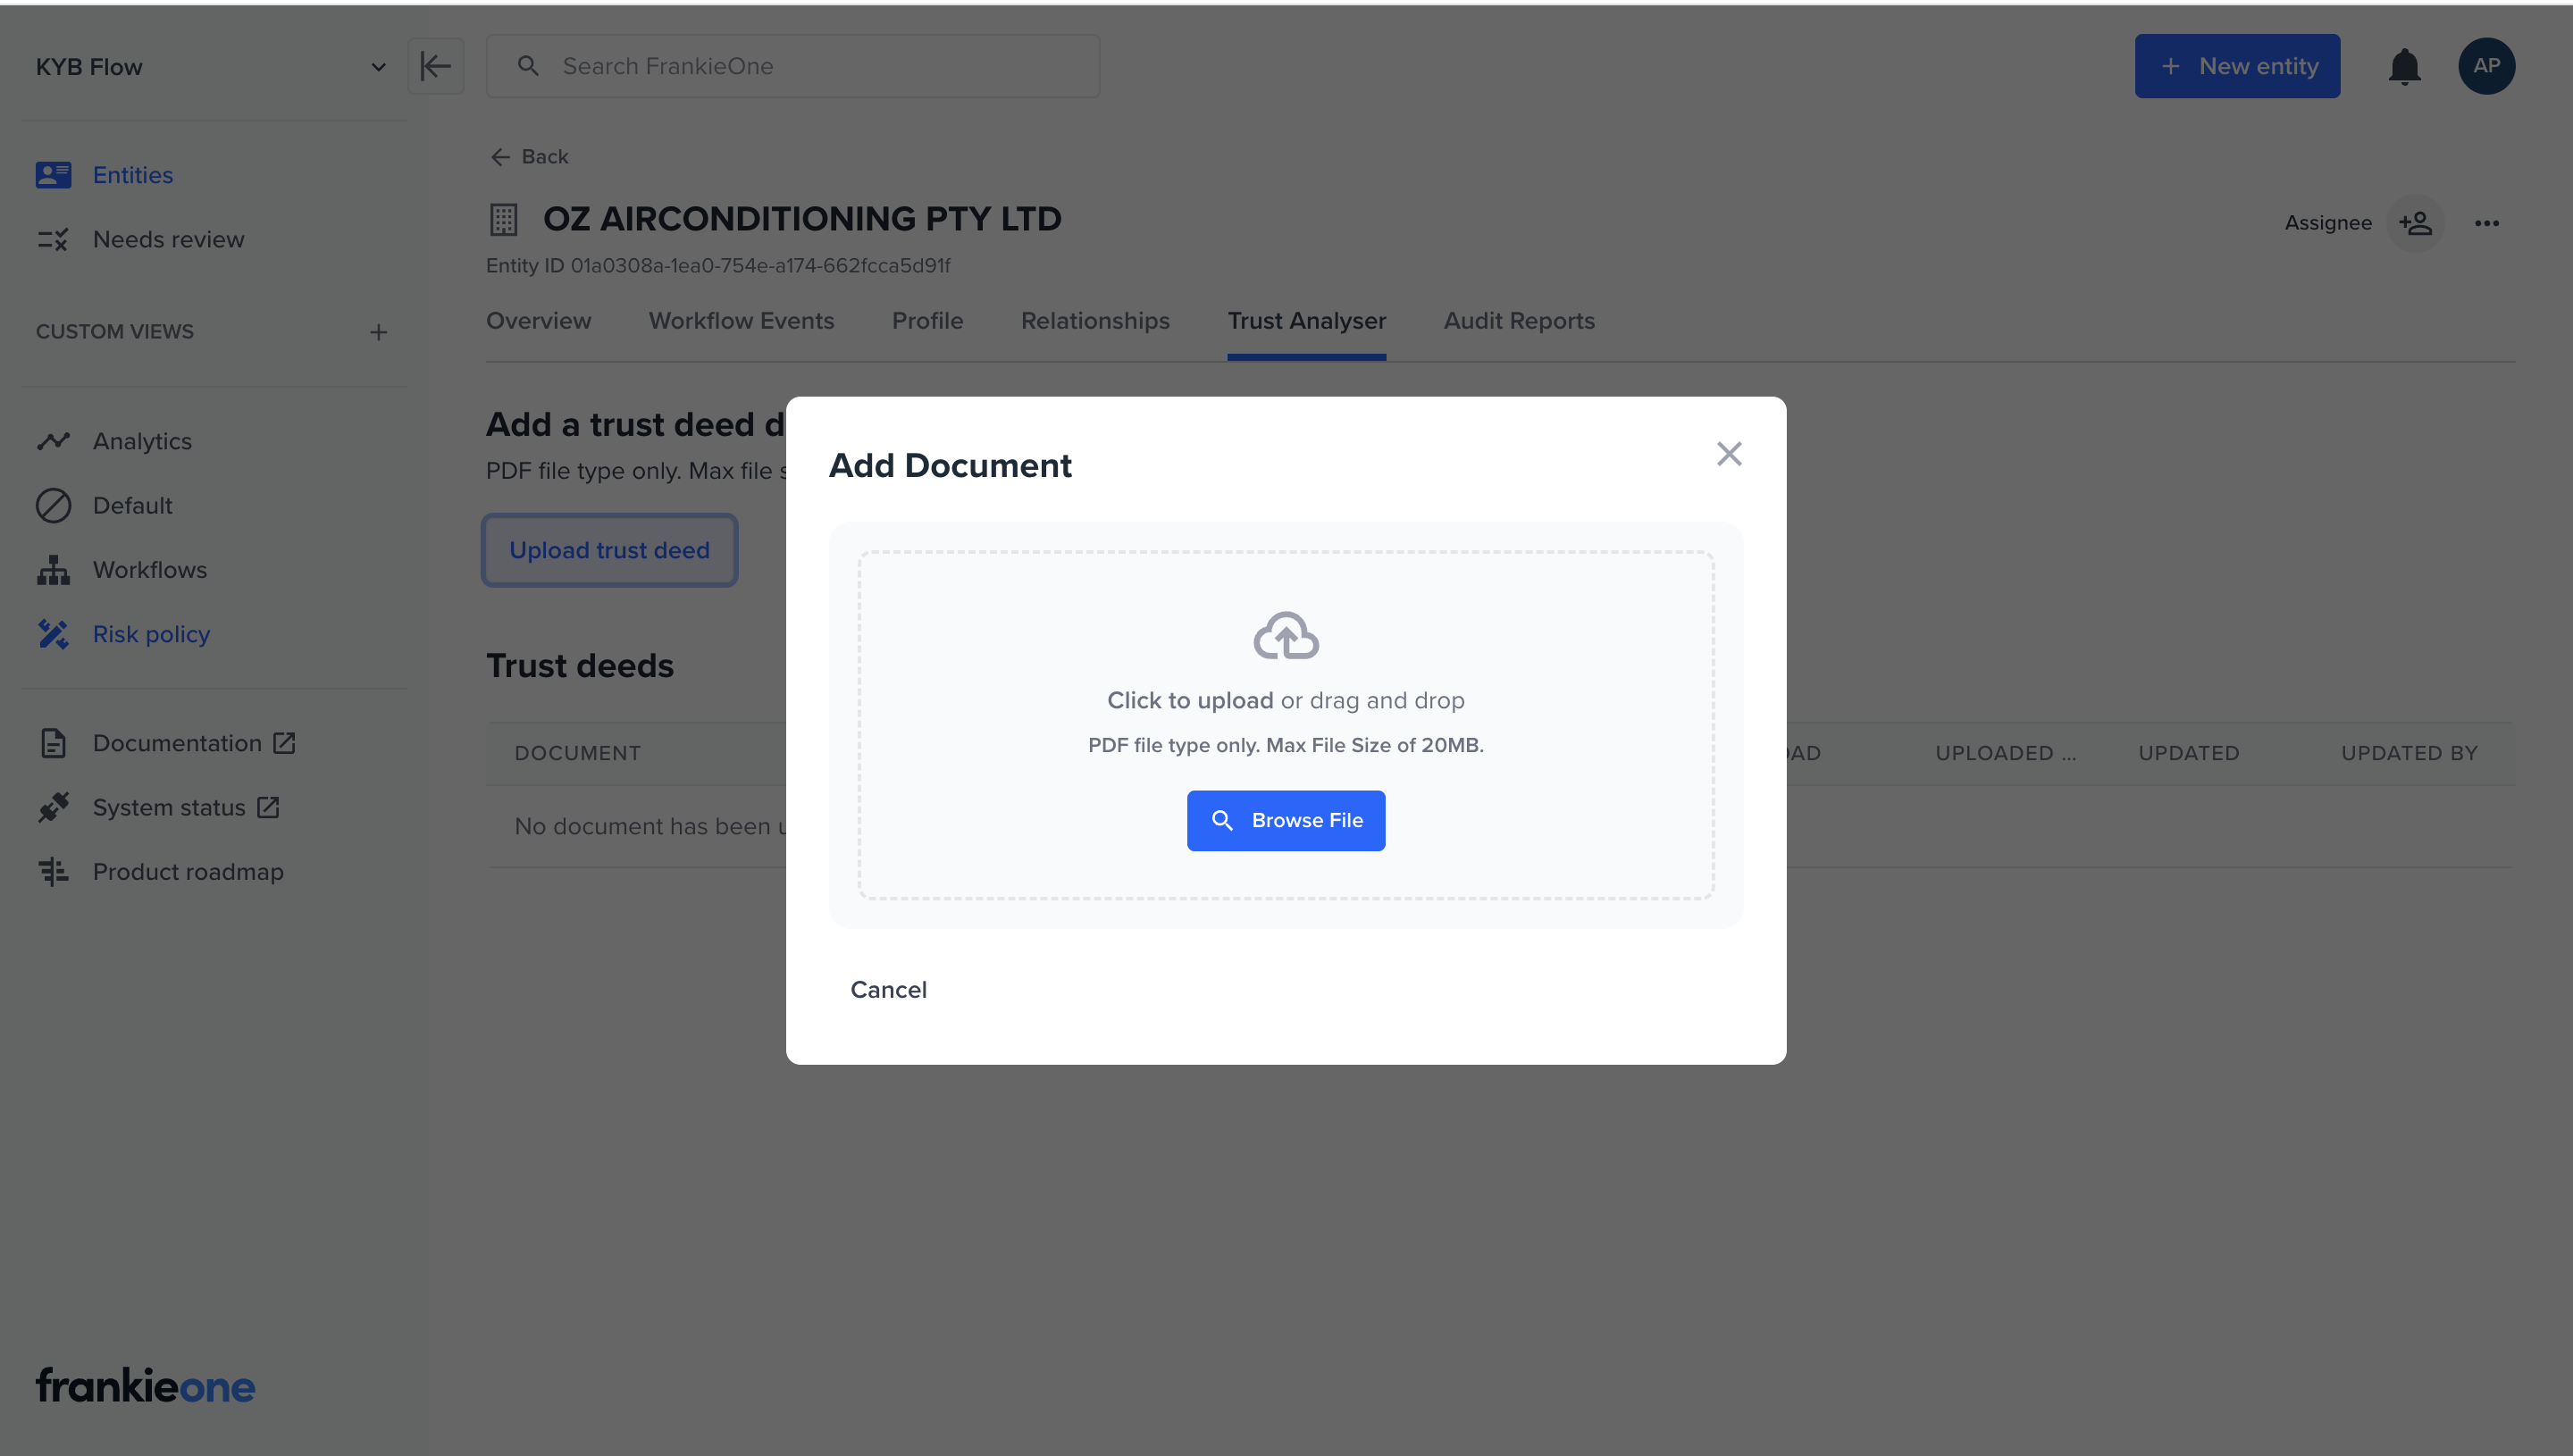
Select Upload trust deed, then either drag and drop the file or select Browse File to choose the PDF (max 20MB).
Add Document dialog with drag-and-drop and Browse File
3
Track progress
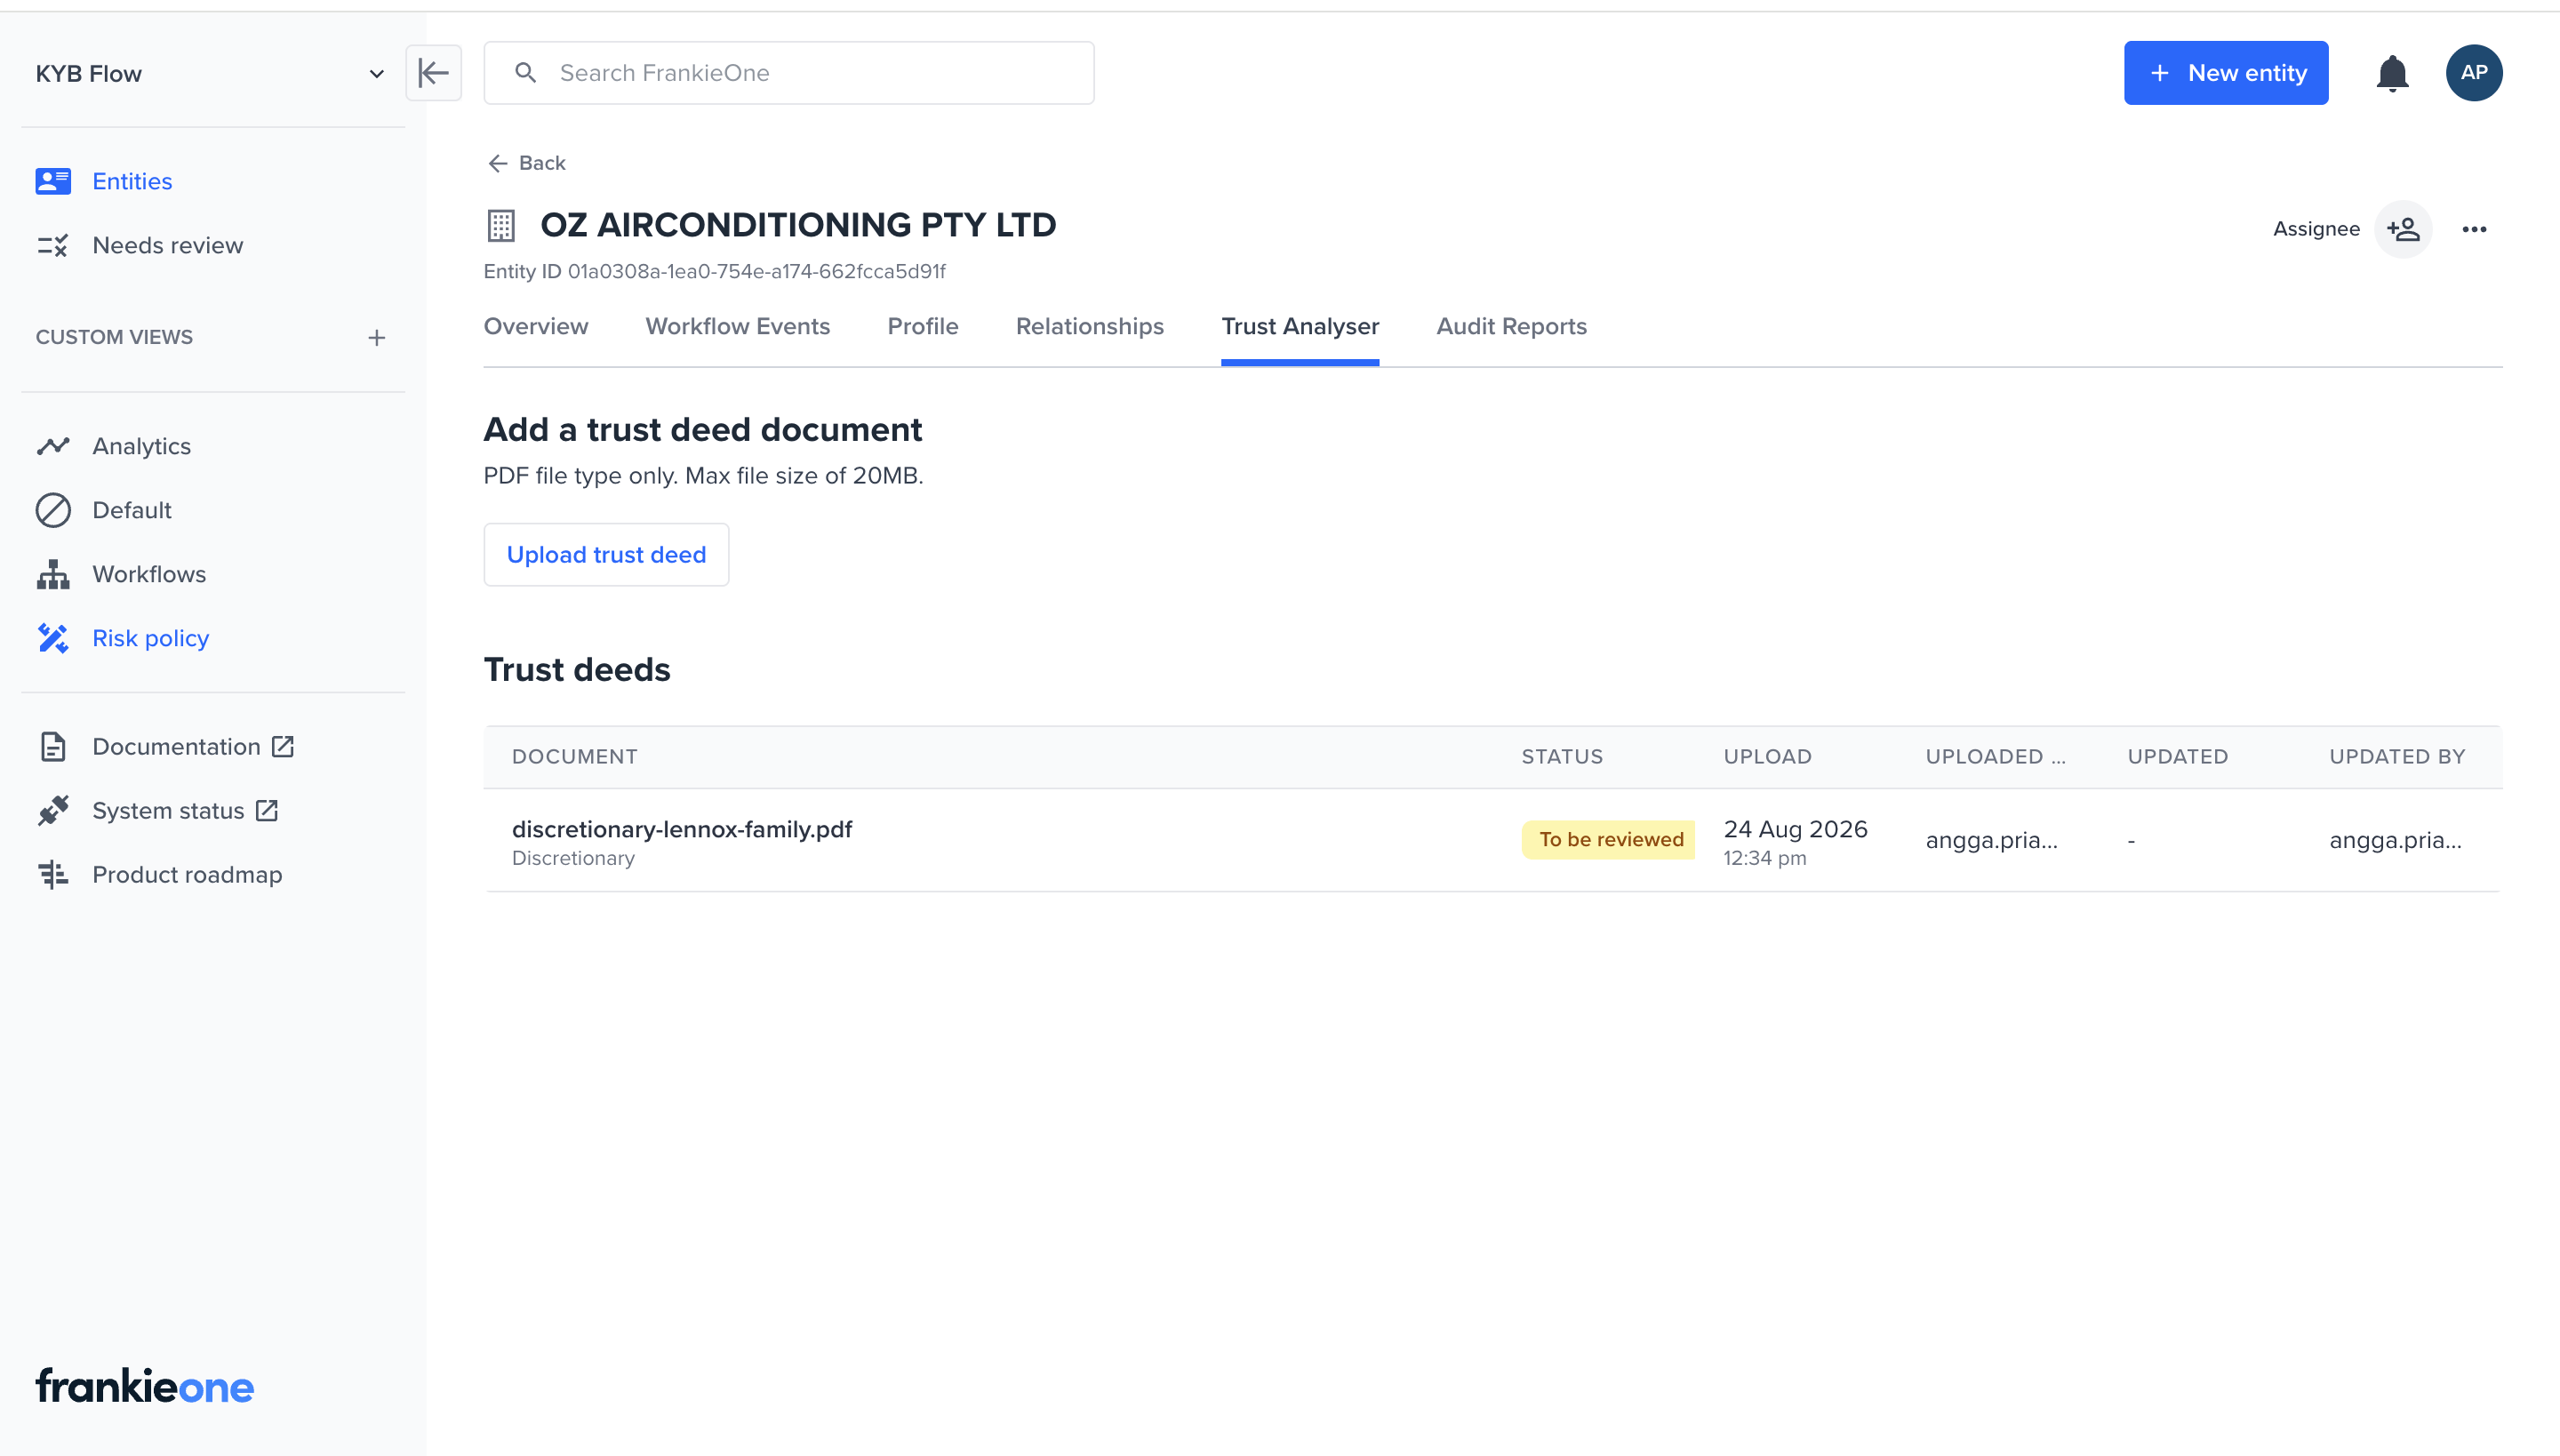
The deed appears in the Trust deeds table on the same tab, with its status shown in the Status column — through analysis, then To be reviewed once the extracted data is ready.Re-uploading and re-analysing an unchanged trust deed reuses the existing valid analysis rather than running a fresh one. If the attachment is later updated or deleted, prior analyses for that document are marked stale.
Trust deeds table showing a deed with status To be reviewed
4
Review and confirm
Select the deed to open the review screen: the deed itself on the left, extracted fields on the right. Each field carries a small reference marker (e.g. 1a, 1b, 2a) — these link back to the exact location in the deed the value was extracted from, so you can verify quickly without re-reading the whole document.Correct any field that needs it directly in the form. When you’re satisfied, select I have reviewed and accept the data in this trust deed and select Save — review and confirmation happen on this one screen, there’s no separate confirm step.If the trust type could not be detected, it’s shown as unclassified with the reasons why. Trust type is inferred automatically and isn’t something you can set or override from the Portal — the analysis can’t be confirmed until the deed is successfully classified.
5
View associated parties
Once saved, confirmed parties are marked as an Associated party directly on the same screen, and appear as part of the organization’s ownership and control structure.
Before running a trust analysis via API, make sure the following are in place:
The Trust Analyzer enabled. The GLB-Trust-Analysis workflow has to be enabled for your environment on the V2 platform. If you don’t see it yet, contact your FrankieOne representative to have it turned on.
An organization entity. Trust analysis runs against an existing organization, the focus entity that holds or is associated with the trust. Create it first and keep its entityId. See Managing Organizations for how to create one.
The trust deed uploaded. The deed must already be attached to that organization as a TRUST_DEED document. You upload it in Step 1 below and keep the returned documentId, which is what the workflow analyses.
A service profile. The serviceName of the Service Profile the organization is assessed against, for example DEFAULT. Your FrankieOne representative provides this when the workflow is set up.
The Trust Analyzer works on a deed that is already attached to the organization, so upload it first. Send the PDF as a base64-encoded attachment on a TRUST_DEED document, and keep the documentId from the response. You pass that documentId to the workflow in the next step.
Execute GLB-Trust-Analysis against the organization’s entityId. Pass the documentId of the uploaded trust deed in executionVariables. This is the only execution variable the workflow needs; the trust type is detected from the document, so you don’t supply it. The optional comment is recorded on the workflow’s audit trail.The response returns a workflowExecutionId. Keep it: you use it in the next step to track the execution.
Re-executing on an unchanged trust deed reuses the existing valid analysis. No new analysis is run and you are not charged again. If the deed’s attachment is later updated or deleted, prior analyses for that document are marked stale.
Trust analysis is asynchronous. The execute endpoint returns 202 Accepted with a workflowExecutionId. Retrieve the execution result and poll until workflowResult.workflowExecutionState is no longer IN_PROGRESS. When analysis completes, the workflow result moves to REVIEW, indicating the extracted data is ready for you to review and confirm. Poll every 5 to 10 seconds.
Fetch the analyses for the document. Use the showResults query parameter to control which analyses are returned: LATEST (default), COMPLETE, or CONFIRMED.Each analysis carries a status (PROCESSING, FAILED, COMPLETE, or CONFIRMED), the detected trust type, the extracted parties, and a references map that points each extracted value back to its location in the deed.
If the trust type cannot be classified, type.detected is UNKNOWN and the trust details include the reasons under typeInformation.unknown. A trust type must be identified before the analysis can be confirmed.
The extracted parties, keyed by id. A party that holds more than one role (for example, a settlor who is also an appointor) appears once here and is referenced from each role.
typeInformation
Type-specific detail, keyed by the trust type. See Supported Trust Types on the overview page.
references
Maps each extracted value back to where it was found in the deed, including the page number, so every field is traceable to its source.
Confirmation is the human sign-off gate: it is how a reviewer accepts the extracted structure for compliance use. To correct any extracted field, send the corrected documentInformation (and any updated references) in the request body; to accept the analysis as-is, send it back unchanged.Confirmation records your accepted version while keeping the original analysis as an audit trail, so you always retain what the analyzer originally produced alongside what was approved. You can confirm again later if something needs to change: the latest confirmation becomes the valid one and earlier confirmations are superseded, while the original analysis stays in place.Confirm against the original analysis (the entry with status: COMPLETE) returned by Step 4.
Once confirmed, the workflow execution’s result moves from REVIEW to COMPLETE — the organization no longer reads as work in progress once a reviewer has signed off.
With a confirmed analysis in hand, link the extracted parties to the focus organization through the relationships API. This attaches the trustees, settlors, beneficiaries, and other parties to the organization as individual and organization relationships, so the trust’s structure is represented on the entity and available to the rest of your KYB process.